Crown Press In Use
Updated: Sep 18, 2021
Using the Crown Press: A Nice Story in Pictures
Before using the Crown Press I highly recommend you read the user manual which you can download here.
I want to give you fair warning: This page goes on forever and ever!! But it's only because there are a lot of photographs. So let's begin this long journey as I guide through the use of the benchtop Crown Press.
The series of photographs that follow provide a step-by-step description of our second round of testing with the Crown Press laboratory scale belt filter press. Our sludge feed consisted of a combined primary sludge + waste activated sludge with a solids content of 4.2 percent. The actual ratio of primary to waste activated solids was not known but given the consistency of the sludge primary solids were predominant.
The first step is to collect the sludge sample. We are doing odor control testing on the sludge cake, comparing several different chemical programs, so we need a lot of cake. For that reason each sludge sample begins with the maximum volume the press can handle which is 400 mL per batch test.

Polymer is added to the 400 mL sludge sample. The polymer used here is a high charge, high molecular weight cationic made down to a 0.2% solution. We added 6 mL of the dilute polymer at a time to the 400 mL sample and simply began to pour the sludge back and forth to mix the polymer into the sludge. After three iterations, three 6 mL shots of polymer added to the sludge, we had the correct dosage. You can easily tell when you have the right polymer dose because clear water starts to separate from the sludge, as you can see in the photograph below.

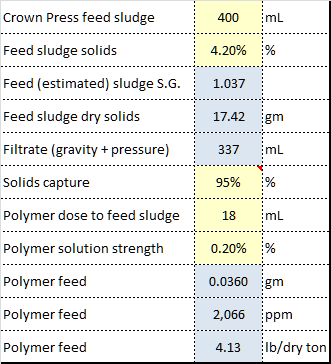
The dosage rate of 18 mL of the 0.2% polymer solution added to 400 mL of sludge with a solids content of 4.2% and an assumed feed sludge specific gravity of 1.037, equates to 4.13 pounds of polymer per dry ton of sludge. This polymer dose is actually on the low side for belt filter presses which have a feed range of 8 to 16 pounds of polymer per dry ton of sludge. (Note: The Crown Press owner's manual states a typical dosage range of 12 to 18 pounds of polymer per dry ton of sludge.)


The properly conditioned sludge is poured onto the filter (a belt filter press belt) resting at the bottom of the gravity drainage filter holder. If you look closely at the photograph you can see that filtrate has begun to stream from the sludge just as soon as the pour started, indicating a well-conditioned feed sludge.

The pour is completed fairly quickly, with all 400 mL of sample added to the gravity drainage retainer ring. (Note: the diameter of the gravity drainage retainer ring is 10 cm.)

The plow simulator is now placed in the gravity drainage retainer ring. This is where things to start to get a little tricky and technique, consisting of plow rotation speed and depth of immersion into the sludge, become key factors. You don't want to push the plow all the way down to the filter when you begin and you don't want to turn the plow too quickly at any time. Either one of these actions will cause a turbidity spike in the filtrate, something we messed up on repeatedly. Slow, slow, slow is the approach here. All you have to do is monitor the filtrate flowing into the beaker to judge how you are doing. With the right technique, and a well-conditioned sludge, the filtrate should remain clear.

When the filtrate stops flowing the gravity drainage step is complete and it's time to make some cake!!

The easiest way to make a cake patty for the press is just to dump the gravity drained sludge into a container, rather than trying to reach into the retainer ring to scoop the sludge out.

This next step works best with two people. Cake patty-maker extraordinaire, Afsary, is preparing an approximate cake patty 10 cm in diameter which he'll place on the 12 cm wide belt being held down by master belt holder Phillip. Nobody can work a Crown Press like these two guys can!

The cake patty is placed on the lower pressure belt. We experimented with the height of the patty, going for the maximum amount we felt we could place on the belt without the sludge squeezing past the belt edges (hard migration). The ideal cake patty sludge height is going to be extremely variable. This particular sludge, at 4.2% solids, was easily conditioned with polymer to form a strong patty. Earlier we had operated the press with a very dilute sludge consisting of primary solids + anaerobically digested sludge. We could not make the cake patty very thick (tall) without risking extrusion of solids past the belt edges. So how high you make the patty will have to be determined on a case-by-case basis.

The top belt is hooked and pressure can now be applied to the belts.

Phillip is performing the initial squeeze. We chose the "pressure regime" suggested in the Crown Press owner's manual. Here's some text quoted from the manual:
"Slowly run the Crown Press through a predetermined pressure regime (see "Establishing a Crown Press Tension Regime"). Alternatively a simple regime might be to press the solids slowly to 100 pounds, release, press rapidly to 130, release, then rapidly to 170 pounds force. Be sure to make the first pressure pull even and slow to approximate the low pressure wedge zone on the press. Hold the press at each designated force to approximate the roller contact time at each roller."
In our testing we followed the "simple regime" described above: Slow pull to 100 pounds, release, then pull to 130 pounds, release, then pull to 170 pounds force and we were done.

Here Phillip is slowly working his way to the first pressure point of 100 pounds force.

After completion of the three pressure points you have made your sludge cake. The top belt is unhooked and the cake is ready to be removed from the lower belt. Note that no cake is sticking to the top belt. This is another indication that you have a "good" feed sludge that is properly conditioned with polymer.

A spatula works best for removing the sludge cake from the lower belt.

As you can see on the scale, the dewatered sludge cake from the first 400 mL sample weighed in at 51 grams. Keep in mind we still have more sludge from the initial 400 mL sample to put on the belt.

With the rest of the polymer-conditioned, gravity-drained sludge dewatered on the Crown Press, our starting sample of 400 mL of feed sludge produced a total of 75 grams of sludge cake.

We are almost at the end of our story. It's now time to talk about the filtrate. The filtrate from the gravity drainage portion of our dewatering effort is shown in the beaker below. Yes, it looks a little dark. This goes back to the comments I made earlier about technique. If you push the plow too far down into the sludge when you first begin, and/or you rotate the plow too quickly, solids capture will decrease immediately and the filtrate will become turbid. We have some work to do here on our gravity drainage technique!

In comparison, the filtrate produced during the pressure squeeze looks great. It's very clear. We did not apply too much pressure during this part of the dewatering and the well-conditioned, high-solids content feed sludge held together while releasing the entrained water.

Summary
So, if you made it this far, let me wrap things up. We started with 400 mL of sludge feed and produced 75 grams of sludge cake. The entire process, from the time the 400 mL of sample was scooped out of the pail to the time the second dewatered cake patty was placed on the scale, took a little less than nine minutes.